How to Contribute a Logo
Thank you for investing your time in contributing to our project! Any contribution you make will be reflected on our GitHub ✨.
Join our Discord server for more information.
In this document, you will learn about the complete workflow for contributing a vector logo to us. Use the table of contents in the top right corner to quickly navigate to specific sections of this guide.
🛠️ Preparation
Vector Graphics Editor
There are many vector graphics editors available for various platforms. We recommend using Adobe Illustrator.
You can also choose other suitable tools according to your needs. Here are some popular vector graphics editors:
Setting Up the Development Environment
This section will guide you through installing the following tools:
- Node.js
- Git
- Visual Studio Code
Before installing these tools, it is best to have some basic understanding of command line tools. The usage of command line tools varies slightly depending on the operating system:
Installing Node.js
Node.js is an environment that allows you to run JavaScript code outside of a web browser. Our project is built using Gatsby. To get Gatsby up and running, you need to install Node.js version 18 (or higher, but below v21) on your computer.
The current Node.js version used by this project is: v20.18.1
For easier management, it is recommended to use Node version managers like nvm or fnm. You also need to install a package manager, and we recommend using Yarn.
For example, on macOS, the installation steps are as follows:
# Install nvm:
curl -o- https://raw.githubusercontent.com/nvm-sh/nvm/v0.40.1/install.sh | bash

# Install Node.js:
nvm install v20.18.1

# Verify Node.js version:
node -v # Should output "v20.18.1".
nvm current # Should output "v20.18.1".

# Install Yarn:
corepack enable yarn

# Verify Yarn version:
yarn -v
For installation methods on other platforms, please refer to: 👉 https://nodejs.org/en/download
Installing Git
Git is a free and open-source distributed version control system. It helps you save different versions of your code and allows team members to collaborate on the same codebase simultaneously.
The steps to download and install Git depend on your operating system. Please follow the guide for your system:
Installing Visual Studio Code
Visual Studio Code (also known as VS Code) is a popular code editor used for writing code for projects. If you do not have a preferred code editor, visit the VS Code site and download the version suitable for your platform.
Of course, you can also use other code editors.
Creating a Github Account
All the code for this project is stored on Github. Therefore, you need to create a Github account to pull, push, and commit code.
After creating your Github account, you can refer to the following documents to set up Git and learn some basic operations:
Forking the Project and Pulling the Latest Code
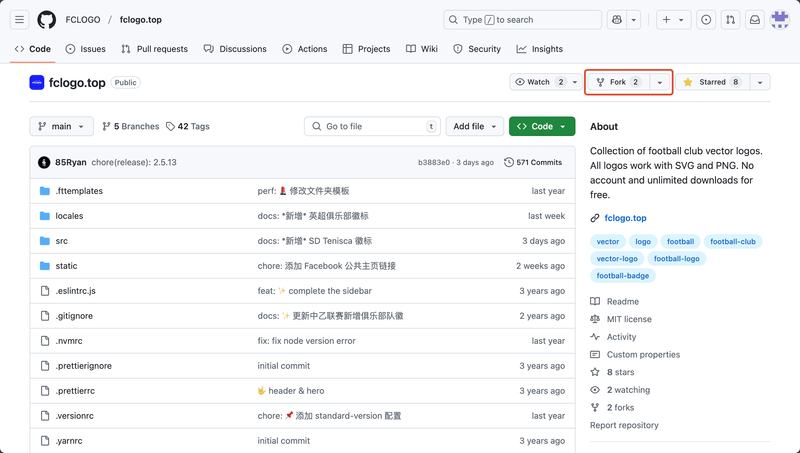
Find the project homepage on Github and click the fork button in the top right corner to fork the project.
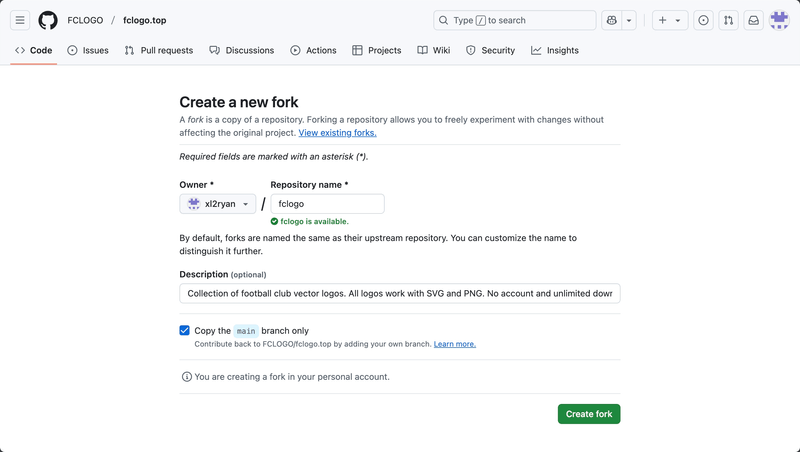
You can rename the project if needed, then click the Create fork button to complete the forking process.
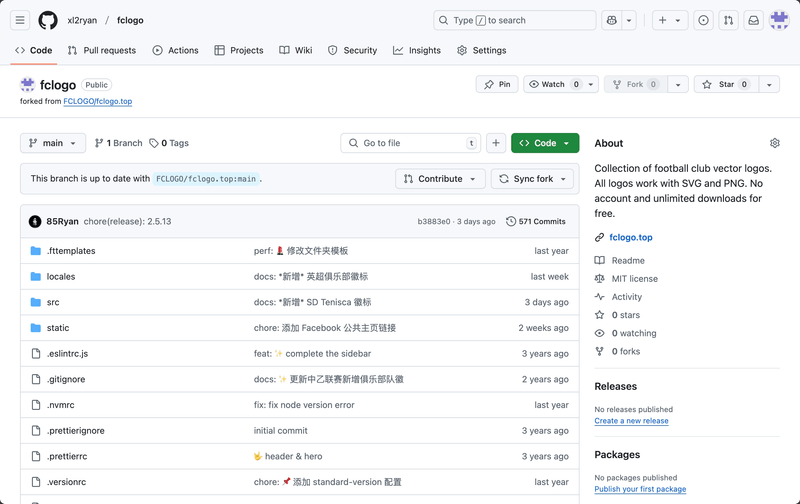
At this point, you have forked the entire project into your own repository, as shown below:
Creating a Local Copy of the Project
Next, we need to clone the project files to your computer for further modifications.
- At the top of the project file list, click the
<> codebutton and copy the repository URL (HTTPS/SSH as needed). (Here we use SSH as an example)
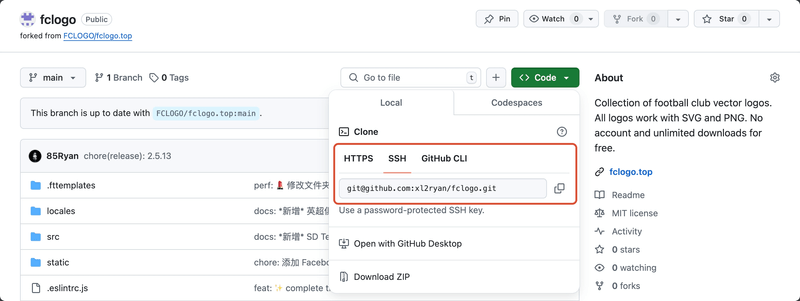
- Open a terminal or other command line tool, change the current directory to the location where you want to store the cloned directory, and type
git clonefollowed by the URL you copied earlier. As shown below:
# Replace the project URL with your own project URL

git clone git@github.com:xl2ryan/fclogo.git
- Press Enter and wait for the process to complete. This will create a copy of the project on your computer.
Cloning into 'fclogo'...
remote: Enumerating objects: 14584, done.
...
Resolving deltas: 100% (6506/6506), done.
Configuring Git to Sync with the Original Repository
To keep your forked repository in sync with the original repository, you can configure Git as follows:
1. Add the Original Repository as a Remote
In the project directory, type the following command in the terminal:
git remote add upstream git@github.com:FCLOGO/fclogo.top.gitIf you are using HTTPS, the URL is: https://github.com/FCLOGO/fclogo.top.git
To verify the new upstream repository for the branch, type git remote -v in the terminal. You should see the URL for your fork as origin and the URL for the upstream repository as upstream.
$ git remote -v
origin	git@xlgit.com:xl2ryan/fclogo.git (fetch)
origin	git@xlgit.com:xl2ryan/fclogo.git (push)
upstream	git@github.com:FCLOGO/fclogo.top.git (fetch)
upstream	git@github.com:FCLOGO/fclogo.top.git (push)
2. Sync with the Original Repository
In the project directory, type the following command in the terminal to sync with the original repository:
git fetch upstreamMerge the local default branch with the upstream branch:
git merge upstream/mainThis will sync your forked default branch with the original repository without losing your local changes.
Running the Project Locally
At this point, you have completed the preliminary preparations. If everything is normal, you can run the following commands in the project directory terminal:
# Install project dependencies
yarn install

# Run the development server locally
yarn dev
When the terminal outputs the following content, it means the project is running successfully locally. You can view the project by entering the address: http://localhost:8000/ in your browser ✨
You can now view fclogo.top in the browser.
⠀
  http://localhost:8000/
⠀
View GraphiQL, an in-browser IDE, to explore your site's data and schema
⠀
  http://localhost:8000/___graphql
⠀
Note that the development build is not optimized.
To create a production build, use gatsby build
🎨 Preparing Vector Logos
The logos collected in the project currently include four types of entities: Associations/Leagues, National Teams, Competitions, and Clubs.
Each logo must include a PNG bitmap png format and an SVG vector svg format, with dimensions of 800px*800px and no background.
Illustrator canvas size reference:
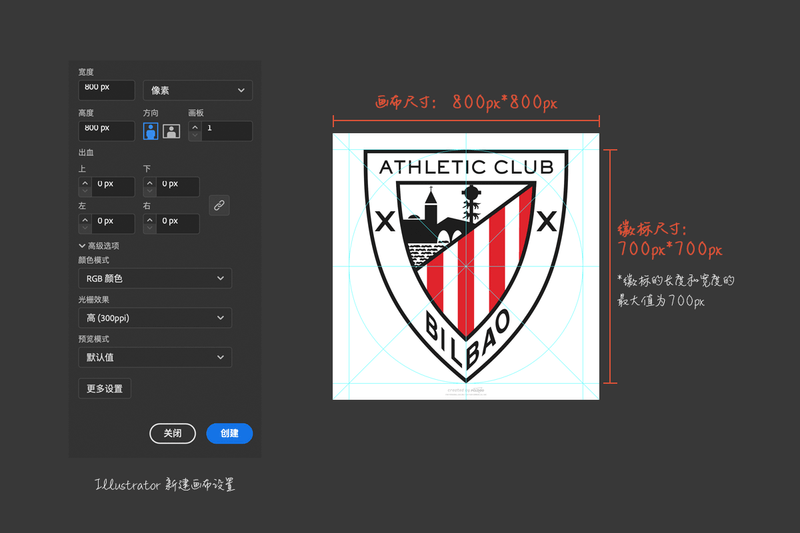
The vector svg file of the logo must follow these principles:
- All elements should use shape fills instead of strokes, and strokes should be outlined.
- Text needs to be converted to outlines.
- Gradient fills can only use linear gradients and radial gradients.
- Monochrome logos should not use clipping masks and should use solid fills. You can use the main color of the entity or black (e.g., #171819).
- Monochrome logos are recommended to be created as a compound path.
- When saving as
svgformat in Illustrator, set the options as shown below:
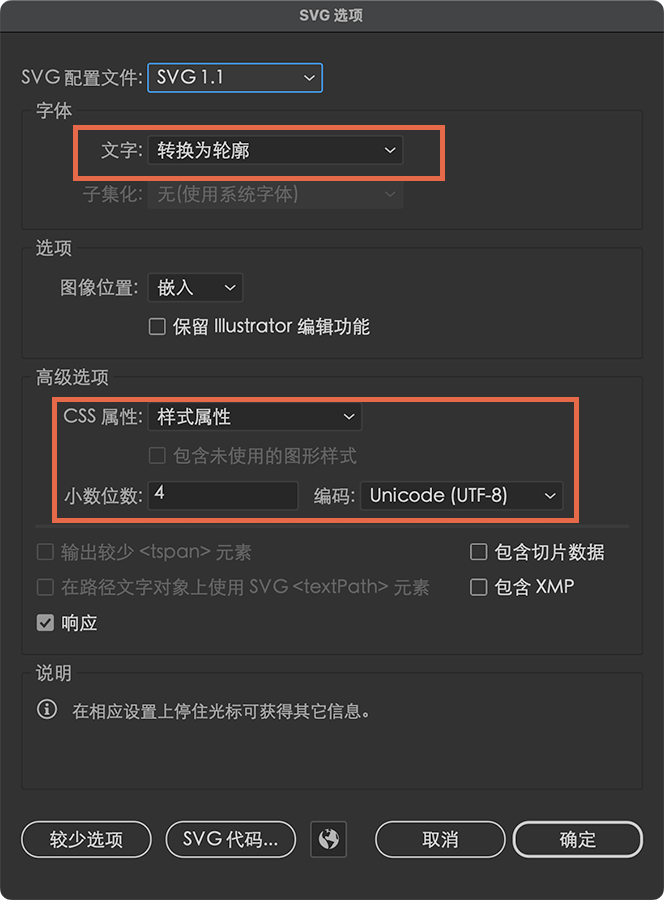
The bitmap png file of the logo can be exported directly from the svg file. The operation path in Illustrator is:
File -> Export -> Export for Screens...Where to Get Vector Logos
- Official Websites: The preferred source. You can search for
svgfiles orpdffiles on the website. - Official Social Media: Official Weibo, X, Facebook, etc. However, these are mostly bitmap files and can be used as references for drawing vector files, such as the monochrome mode of the logo.
- Wikipedia: Most of the main images in Wikipedia entries are in
svgformat. - Other Vector Logo Download Sites: Such as Seeklogo, LOGOS-WORLD, WorldVectorLogo, etc.
- Self-drawing: Refer to bitmap logos on official websites or social media and use Illustrator to convert them to vector format.
🔖 Creating the Logo Database
If everything goes well, you have prepared the development environment and logo files. Now we need to import the logo files into the project database.
Most of the following operations will be performed in VS Code. To reduce our workload, we need to install the following two plugins in VS Code:
- FCLOGO Snippets: A code snippet plugin that helps us quickly input fields for entities and logos.
- Folder Templates: A folder template plugin that helps us quickly create folder templates.
In addition to installing through the above links, you can also click the Extensions icon on the left side of VS Code and search for the extensions by name in the marketplace.
Creating Entity Information
Before importing the logo, you need to confirm whether the entity information of the logo already exists. You can search for entity information on the index page.
If the entity information does not exist, follow the subsequent steps to create the entity information. If the entity information already exists, you can skip this step and directly add logo information in the entity directory.
Creating the Entity Directory
-
Open the project directory with VS Code and navigate to the logo storage directory:
src/data/logos.The naming organization principles of the
logosfolder are as follows:logos |__CFA # Association directory, named after the association abbreviation |__clubs # Club directory | |__001_SD Taishan # Club logo directory, named after the sequence number + club name | |__002... |__comps # Competition directory | |__001_CSL # Competition logo directory, named after the sequence number + competition name | |__002... |__team # National team directory |__China National Team # National team logo directory, named after the national team name -
According to the entity information of the logo to be imported, search for or create the corresponding folder.
Here, we take the creation of the La Liga Athletic Bilbao directory as an example:

Creating the Athletic Bilbao Club Logo Directory First, navigate to the
RFEF (Royal Spanish Football Federation)/clubsdirectory in the VS Code explorer. We need to create the Athletic Bilbao club directory.Right-click on the
clubsfolder and selectCreate New Templated Folderfrom the context menu.Select the preset template name
Logo Folderat the top of the VS Code window, then enter the name004_Athletic Bilbaoand pressEnterto confirm.After completion, you will see the Athletic Bilbao club directory we created in the explorer (the rightmost image above).
The creation method for other types of entities (associations/leagues, competitions, national teams) is similar.
Creating Entity Information
Entity information is a brief introduction to the logo entity, including: entity name, country, coordinates, founding year, city, stadium, official website link, social media links, etc.
The complete data fields supported by each entity type are as follows:
| sourceID | Yes | The unique identifier of the entity, named as: association abbreviation-entity type-sequence number, e.g., rfef-club-004. It can only contain lowercase English letters, hyphens, and numbers. |
||
| status | club | Yes | active | Indicates the current operating status of the club. active means the club is operating, inactive means the club has stopped operating. |
| type | Yes | Indicates the entity type, which can only be: club, comp, assn, team, representing: club, competition, association/league, national team. |
||
| nation | Yes | Indicates the country to which the entity belongs, using the ISO 3166-1 alpha-3 three-letter code. Required for club entities. | ||
| coordinates | club | Yes | The coordinates of the club's location, represented as an array, with longitude lon first and latitude lat second, e.g., [116.447, 39.930]. |
|
| timeline | No | false | Indicates whether the logo timeline (historical logos) of the entity is fully collected. true means complete, false means incomplete. |
|
| fullName | Yes | The full name of the entity | ||
| localName | Yes | The local language name of the entity | ||
| shortName | Yes | The short name of the entity | ||
| founded | No | The founding year of the entity, only numbers can be used | ||
| city | club | No | The city where the club is located, e.g., Spain, Madrid, or Madrid |
|
| ground | club | No | The club's home stadium | |
| confederation | comp | No | The continental confederation to which the competition belongs, e.g., AFC, UEFA |
|
| teams | No | The number of teams in the competition, represented by a number, e.g., 20 |
||
| level | No | The level of the competition, e.g., Level 1 |
||
| promotion | No | The competition for promotion | ||
| relegation | No | The competition for relegation | ||
| headquarter | assn | No | The city where the association/league headquarters is located | |
| affiliations | assn | No | The affiliations of the association/league, e.g., East Asian Football Federation ▸ Asian Football Confederation ▸ FIFA |
|
| duration | club | No | The operating period of the club, e.g., 1990 - 2000. This field is only used for clubs that have stopped operating |
|
| assn | team | No | The association to which the team belongs | |
| conf | team | No | The continental confederation to which the team belongs | |
| code | team | No | The country code of the team | |
| websiteURL | No | The official website link of the entity | ||
| twitterURL | No | The official X (Twitter) link of the entity | ||
| weiboURL | No | The official Weibo link of the entity | ||
| wikiURL | No | The Wikipedia link of the entity |
We continue to use Athletic Bilbao as an example to complete the entity information.
In the 004_Athletic Bilbao folder we created in the previous step, open info/info.yaml, type cbinfo, and press tab to quickly generate the club entity data template:
- data: sourceInfo
  sourceID: ass-club-000
  status: active
  type: club
  nation: nation
  coordinates: [lon, lat]
  timeline: false
  info:
    - fullName: fullname
      localName: localName
      shortName: shortName
      founded: year
      city: city
      ground: ground
  websiteURL: ''
  twitterURL: ''
  weiboURL: ''
  wikiURL: ''
Generate the data template, then press tab again to complete the information. Non-required fields can be left blank (if there is a default value, delete it). Here is the completed Athletic Bilbao entity information:
- data: sourceInfo
  sourceID: rfef-club-004
  status: active
  type: club
  nation: ESP
  coordinates: [-2.949361, 43.264167]
  timeline: false
  info:
    - fullName: Athletic Club Bilbao
      localName: Athletic Club de Bilbao
      shortName: Athletic Bilbao
      founded: 1898
      city: Bilbao
      ground: Estadio San Mamés
  websiteURL: 'https://www.athletic-club.eus/en/'
  twitterURL: 'https://twitter.com/AthleticClub'
  weiboURL: ''
  wikiURL: 'https://en.wikipedia.org/wiki/Athletic_Bilbao'
In general, at this point, you have successfully created the entity information for a club. Our project currently supports two languages: English en and Simplified Chinese zh-cn. Based on the English version, you can create a Simplified Chinese version. Just copy all the content from info/info.yaml to info/info.zh-cn.yaml and translate the content, as shown below:
- data: sourceInfo
  sourceID: rfef-club-004
  status: active
  type: club
  nation: ESP
  coordinates: [-2.949361, 43.264167]
  timeline: false
  info: # Only this part needs to be translated
    - fullName: 毕尔巴鄂竞技俱乐部      localName: Athletic Club de Bilbao
      shortName: 毕尔巴鄂竞技      founded: 1898
      city: 毕尔巴鄂      ground: 圣马梅斯球场  websiteURL: 'https://www.athletic-club.eus/en/'
  twitterURL: 'https://twitter.com/AthleticClub'
  weiboURL: ''
  wikiURL: 'https://en.wikipedia.org/wiki/Athletic_Bilbao'
The creation of other entity information is similar to the creation of club entity information. The shortcut input code for association/league entity information is asinfo, the shortcut input code for competition entity information is cpinfo, and the shortcut input code for national team entity information is ntinfo.
Creating Logo Information
Organizing Logo Files
Earlier, we prepared the club logos (svg and png files) to be imported. Now we need to name these logo files.
The naming of logo files follows these principles, and the svg file name and png file name must be consistent:
- File name composition:
ClubEnglishName-vLogoVersionNumber-StyleName-OtherDistinguishingName - Club English Name (required): Capitalize the first letter of each word, and use hyphens
-to connect words - Logo Version Number (required): Generally the year the logo was adopted
- Style Name (not required): Logo styles include color
color, monochromemono, etc. The color style is the default style and can be omitted from the file name. Other style names cannot be omitted. - Other Distinguishing Name (not required): If there are multiple versions of the same logo version and style, you can add another field to the file name to distinguish them.
Here are some acceptable file name examples:
Athletic-Club-Bilbao-v2008.svg
Athletic-Club-Bilbao-v2008-mono.svg
Athletic-Club-Bilbao-v2008-digital.svg
Liverpool-Football-Club-v2012-minor.svg
Real-Madrid-v1996-mono-2.svg
After naming the logo files, copy the png files to the png folder under the entity directory and the svg files to the svg folder under the entity directory.
For example: 004_Athletic Bilbao/png, 004_Athletic Bilbao/svg.
Creating Logo Information
Logo information includes the logo version, PNG file path, SVG file path, entity ID, style, reference source, contributor ID, etc. The complete data fields supported are as follows:
| logoID | Yes | The unique identifier of the logo, composed of: creation date-creation time-random hexadecimal number. The FCLOGO Snippets plugin can automatically generate it |
|
| version | Yes | 0000 | Generally the year the logo was adopted. If there are multiple logos in the same year, you can use the month to distinguish them, e.g., 2020.02. If the adoption year of the logo cannot be determined, use the default value 0000 |
| isDoubtful | Yes | false | Whether there is any doubt about the logo information. If there is doubt, it is true, otherwise it is false |
| isOutdated | Yes | false | Whether it is a historical logo. If it is, it is true, otherwise it is false |
| verName | No | The name used by the entity when using this logo, mostly used for historical logos. It can also be other names of the entity, and can have multiple values, e.g., ['name 1', 'name 2'] |
|
| slug | Yes | The link to the logo details page, composed of /association abbreviation/entity type/logo file name, e.g., /rfef/club/Athletic-Club-Bilbao-v2008 |
|
| pngPath | Yes | The path to the logo PNG file. Note that it should be consistent with the file name. The FCLOGO Snippets plugin can be associated with other fields to generate it | |
| svgPath | Yes | The path to the logo SVG file. Note that it should be consistent with the file name. The FCLOGO Snippets plugin can be associated with other fields to generate it | |
| sourceID | Yes | The ID of the logo entity, i.e., the entity information ID created in the previous step, e.g., rfef-club-004. The FCLOGO Snippets plugin can be associated with other fields to generate it |
|
| style | Yes | color | The style code of the logo. Currently supported styles are: color, minor, comm, mono, text, graph, circl, full, star. See the table below |
| reference | No | The source of the logo, reference materials | |
| ctrbID | No | The contributor ID of the logo. If you are contributing a logo for the first time, you need to create your contributor ID first. See: Creating a Contributor ID |
Currently supported logo style names:
| color | Color | The default style of the logo. Each logo must include a color version |
| minor | Minor Logo | The second logo used by the entity |
| comm | Commemorative Logo | The commemorative logo used by the entity, such as anniversary commemorations |
| mono | Monochrome | Monochrome style logo |
| text | Text Logo | The text style of the logo |
| graph | Graphic Logo | The graphic style of the logo |
| circl | Circular Logo | The circular version of the logo |
| star | Champion Star Logo | The logo with champion star style |
| full | Full Logo | The full style of the logo |
The main styles of the logo are color, minor, and comm. Other styles are derivative styles of the main styles of the logo.
We continue to use Athletic Bilbao as an example to add the 2008 version of the logo.
In the 004_Athletic Bilbao folder, open logo.yaml, type lgdata, and press tab to quickly generate the logo data template:
- data: logo
  logoID: 20241231-164558-7d2162
  version: 0000
  isDoubtful: false
  isOutdated: false
  verName: [name]
  slug: /name/type/name-v0000-mono
  pngPath: 'png/name-v0000-mono.png'
  svgPath: 'svg/name-v0000-mono.svg'
  sourceID: name-type-000
  style: color
  reference: ''
  ctrbID: ''
Generate the data template, then press tab again to complete the information. Non-required fields can be left blank (if there is a default value, delete it). Here is the completed logo information:
- data: logo
  logoID: 20241231-164728-11487e
  version: 2008
  isDoubtful: false
  isOutdated: false
  verName: ['Athletic Bilbao']
  slug: /rfef/club/Athletic-Club-Bilbao-v2008
  pngPath: 'png/Athletic-Club-Bilbao-v2008.png'
  svgPath: 'svg/Athletic-Club-Bilbao-v2008.svg'
  sourceID: rfef-club-004
  style: color
  reference: 'https://www.athletic-club.eus/en/'
  ctrbID: 'ctrb-ryan'
Like the entity information, copy all the content from logo.yaml to logo.zh-cn.yaml and complete the translation (only the verName field needs to be translated, or you can keep the English version):
- data: logo
  logoID: 20241231-164728-11487e
  version: 2008
  isDoubtful: false
  isOutdated: false
  verName: ['毕尔巴鄂竞技']  slug: /rfef/club/Athletic-Club-Bilbao-v2008
  pngPath: 'png/Athletic-Club-Bilbao-v2008.png'
  svgPath: 'svg/Athletic-Club-Bilbao-v2008.svg'
  sourceID: rfef-club-004
  style: color
  reference: 'https://www.athletic-club.eus/en/'
  ctrbID: 'ctrb-ryan'
Creating Contributor ID
Open the file /src/data/contributors/contributor.yaml with VS Code and add the following code:
- data: contributor
  ctrbID: # ctrb-Name Abbreviation
  name: # Your Name
  link: # Your Profile Link
For example:
- data: contributor
  ctrbID: ctrb-ryan
  name: iiiRyan
  link: https://weibo.com/u/1652080652
📤 Submitting Code
At this point, we have successfully added the logo to the local development environment. You can run the following command in the terminal:
yarn devAfter completion, enter: http://localhost:8000/ in the browser to preview the web page effect.
Submitting Changes
If everything is normal in the development environment preview, you can submit the code to your project repository.
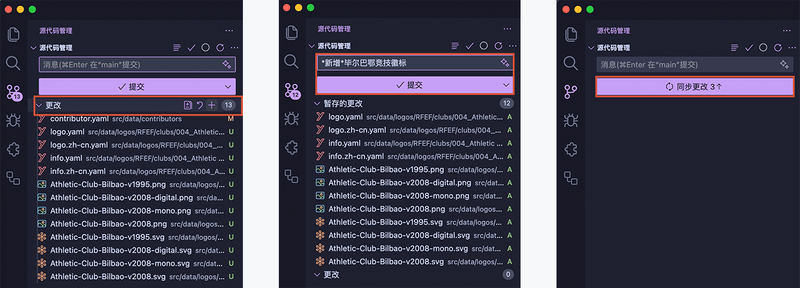
- Click the Source Control icon on the left side of VS Code, click the
+Stage All Changes button on the right side of the Changes title. - Enter the change information in the text box above the Commit button, e.g.,
Add Athletic Bilbao logo, then click the Commit button. - Click the Sync Changes button to sync the code to the remote repository.
After the push is complete, you will see the changes in the Github remote repository.
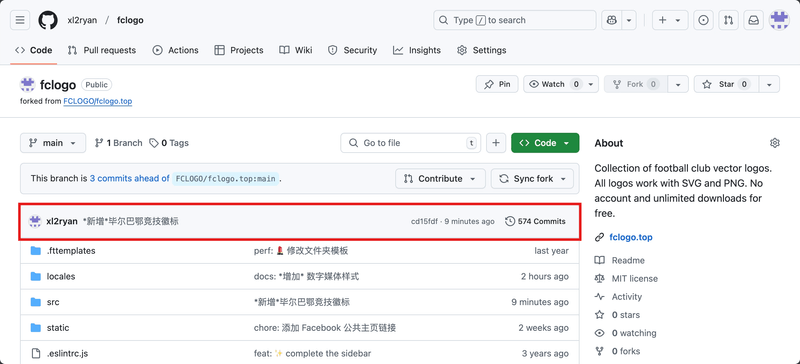
You can also submit through the terminal/command line tool:
# Stage changes
git add .

# Commit change information
git commit -m "Add Athletic Bilbao logo"

# Push to remote repository
git push
Submitting a PR (Pull Request)
Currently, the logo information changes are only stored in your forked project repository. Next, we need to submit the updates to the original project repository.
-
On the main page of your forked project, click
Pull Requests, then click theNew pull requestbutton.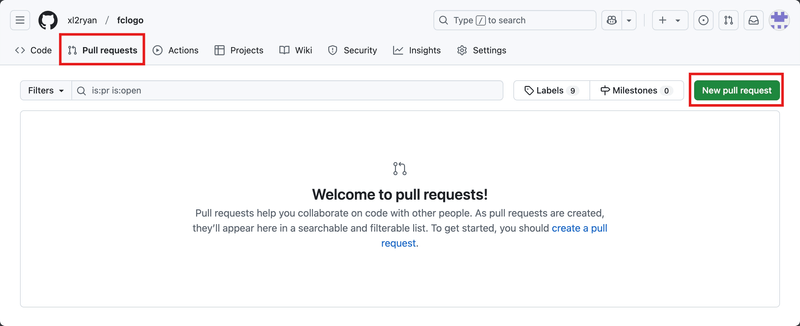
Creating a New Pull Request -
Confirm that the repository and branch are correct, then click the
Create pull requestbutton.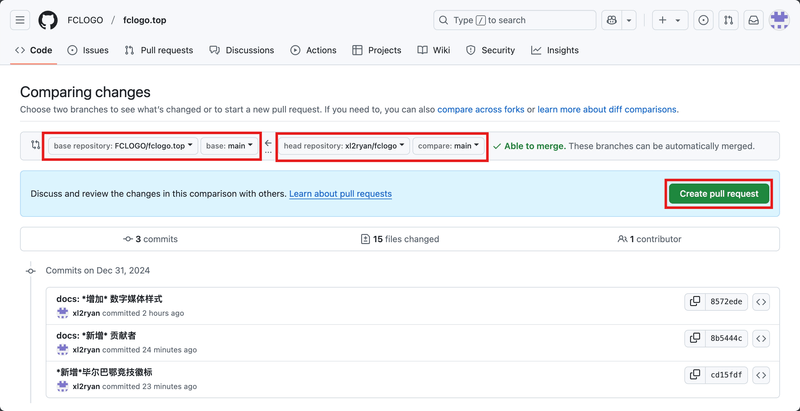
Creating a New Pull Request -
Fill in the change information, then click the
Create pull requestbutton.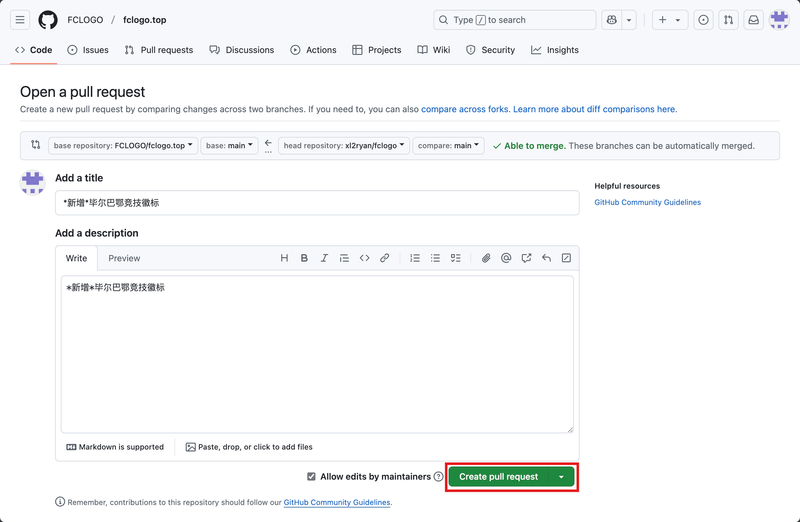
Creating a New Pull Request
After the review is complete, the logo you submitted will be merged into the main project.
Enjoy It! ✨✨